Getting Started
Welcome to MergeRAW
Your First Merge
Select your photos in the Library module, right-click, and choose Export › Merge Raw Files. The same thing lives under File › Plug-in Extras if you prefer the menus.
Pick an alignment mode, pick a blend mode, click OK. Hover over a control for a short explanation; the tooltips follow your selected language and mode. The merged DNG lands in your catalog next to the originals, which are never touched.
Frames have to be raw or DNG files from the same camera, all the same size. JPEGs and TIFFs are not raw enough to merge this way.
If you are not sure what to choose, these three cover most of it:
- An extra long exposure on a tripod. No Alignment plus Normal. Ten thirty-second frames blur the water and the clouds like one five-minute exposure, without needing the ND filter or the shutter speed to do it.
- A handheld burst, to cut noise. Auto Align plus Normal. In low light, Night Align plus Median.
- A busy scene you want emptied. Auto Align plus Median, and shoot a dozen frames over a couple of minutes.
Alignment Mode
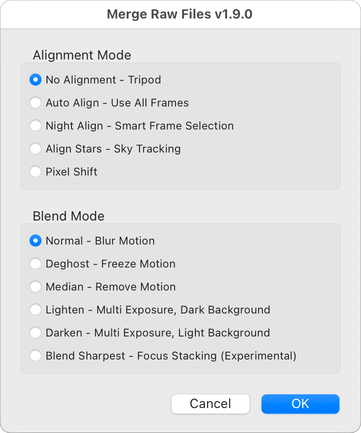
How the frames get lined up with each other.
No Alignment - Tripod
Uses the frames exactly as shot. Right for a solid tripod, for in-camera multiple exposures, and any time you want the frames left alone.
Focus Stacking is the exception: Tripod still corrects focus breathing, the change in magnification as the lens refocuses. It adjusts scale around the image center, without shifting or rotating the frames. Use Auto Align when the camera or image position also moves.
Auto Align - Use All Frames
Lines the frames up and keeps every one. The safe choice for handheld work and for a tripod that got bumped. If the frames were already aligned it detects that and skips the work.
Night Align - Smart Frame Selection
For handheld bursts in low light. As well as aligning, it decides which frames belong in the merge: blurry ones go, ones it cannot line up confidently go, and it favors the stretch of the burst where your hands were steadiest.
Align Stars - Sky Tracking
For untracked night sky exposures. The Fixed Stars blends align on the stars rather than the ground, reducing noise while keeping stars pinpoint and rejecting satellite and aircraft trails. Cloud-hidden frames can still contribute. For trailing stars, choose the Star Trails & Foreground blend described below.
Pixel Shift
For sequences shot in your camera's pixel shift or high resolution mode. Gives real measured color at every pixel, and on the half-pixel modes, extra resolution. Nikon, Sony, Canon, Pentax and Fujifilm.
Select the whole sequence and nothing else. For most cameras this expects 4, 8, 16 or 32 frames. 5 or 20 frames for Fujifilm X-Trans.
Blend Mode
What happens where the frames disagree.
Normal - Blur Motion
Exposure-weighted average. The noise reduction workhorse. Anything that moved becomes a soft blur, which is the effect you want for water and traffic.
Deghost - Freeze Motion
Averages the still parts, but keeps anything that moved looking as it does in your active (most selected) photo. For a person walking through, or leaves in the wind, when you still want clean shadows everywhere else. With Night Align, motion comes from the automatically chosen anchor frame, which may differ from your active photo.
Median - Remove Motion
Keeps what most frames agree on. Moving objects can disappear if each part of the background is unobstructed in most frames. For a busy square, spread the shots over time so people move out of the way.
Lighten - Star Trails & Multi Exposure
Keeps the brightest version of each pixel. Star trails, fireworks, light painting, or a multiple exposure of a lit subject on a dark background.
For the choice between this mode and the sky-aligned star-trail blend, see Choosing a Star-Trail Workflow below.
On star trail stacks it does two extra things, both automatically. It puts back the light that is otherwise lost where one frame's trail segment meets the next, which is what makes long trail stacks come out beaded. And it repairs the yellow and cyan segmentation that shows up on tight pinpoint trails, worst on the ones running along the image rows. Neither touches a stack that is not star trails, so fireworks and light painting come out exactly as before.
Darken - Multi Exposure on Light Background
Keeps the darkest version of each pixel. Birds against snow, or any multiple exposure built up against a bright background.
Focus Stacking
Takes each part of the picture from the frames where it is actually in focus. For focus brackets, from in-camera bracketing or a rail.
Tripod corrects focus breathing only; Auto Align also corrects shifts and rotation. If wind-blown leaves pull alignment away from a still background, try Tripod and compare the result.
Shoot near to far. That is what in-camera bracketing does anyway, and a manual rail run the other way can pick the wrong frame to build on.
Since 2.3.0, depth selection is more stable where detail is weak or no frame reaches focus. This reduces hard seams in out-of-focus backgrounds and improves outer image borders. It cannot recover detail that was never in focus; extend the bracket to infinity when you want the distant background sharp.
Focus Stacking - Retain Extra Detail
Uses the same smooth focus blend, then recovers fine texture from the source frames. Try it for bark, foliage, stone, and other subjects where the standard blend leaves some detail soft. It keeps the broader shapes and tonal transitions of Focus Stacking.
This option takes more time and memory. Both choices use the alignment mode you select: Tripod corrects changes in magnification, while Auto Align also corrects camera movement. Neither can make an unfocused background sharp or fully resolve subjects moving between frames; compare the two if moving leaves, water, or overlapping edges produce artifacts.
Labels That Change
Some alignment modes reuse these radios, and gray out the ones that cannot apply.
Align Stars renames the first four and disables the rest. Normal - Fixed Stars keeps the stars sharp and lets the landscape blur. Basic Mask - Fixed Stars & Foreground keeps both sharp in one file. AI Mask - Fixed Stars & Foreground does the same job with an optional image model helping to find the skyline, which is worth it when the horizon is trees, branches or a rocky ridge. AI Mask - Star Trails & Foreground is the same masked merge with the stars left trailing, for a short-exposure sequence you would rather turn into a star-trail image. A frame that light-paints the foreground is used there in full rather than averaged away, and kept out of the sky. See AI Mask below.
Under Night Align, Median is the default: an average that rejects anything out of place. Normal is a plain average of the surviving frames, for when the motion is the picture. Deghost freezes a moving subject. The rest are grayed out.
Pixel Shift offers only Normal and Deghost, since the shifted frames have to be assembled a particular way.
Choosing a Star-Trail Workflow
Both options draw star trails. Start with the exposure of each frame and how much noise the foreground has, rather than a strict frame-count cutoff.
| Setup | Best starting point | Foreground |
|---|---|---|
| No Alignment - Tripod + Lighten - Star Trails & Multi Exposure | A simple, well-exposed sequence with a moderate number of frames | Keeps the brightest samples; does not average away noise |
| Align Stars - Sky Tracking + AI Mask - Star Trails & Foreground | Many shorter exposures, especially with a dark or noisy landscape | Averages the aligned foreground for less noise, while preserving well-lit foreground frames |
Tripod + Lighten: a straightforward trail stack
Use this when individual frames already expose the scene well and you have a moderate number of them. It keeps the brightest version of each pixel across the whole picture, so trails, fireworks and light painting build up directly. Automatic star-trail repair helps join segments and reduce false color.
The camera should stay fixed: aligning the whole picture to the stars would move the ground. Because Lighten takes bright samples rather than averaging them, adding more frames does not clean up the foreground the way a normal average would. Noise peaks can accumulate, especially with many short, dark exposures.
Align Stars + Star Trails & Foreground: a cleaner landscape
Use this when you have a large number of shorter exposures and want a cleaner foreground. MergeRAW uses sky alignment to work out which areas are sky, then combines trailing stars from the unaligned frames with a still, averaged foreground. The name Align Stars does not mean the final stars are frozen in this blend.
The main noise-reduction advantage is in the foreground. The sky still uses a brightest-pixel blend, with noise-aware suppression to protect faint trails; it is not averaged like the Fixed Stars modes. A frame that lights the foreground can contribute at full brightness instead of fading into the average, and is kept out of the sky when appropriate.
This route also depends on separating sky from ground. The AI-assisted mask runs on your computer after the optional model download; see About the model. Inspect the skyline around branches and other fine detail. For a clean, well-exposed sequence, the simpler Lighten result may already be all you need.
Keep the camera on a stable tripod for either workflow and minimize gaps between exposures. There is no fixed number of frames where you must switch: compare the foreground noise and the skyline. To make pinpoint stars instead of trails, choose one of the Fixed Stars blends.
AI Mask - Fixed Stars & Foreground
Keeping the stars pinpoint and the landscape sharp in one file comes down to a single question: which pixels are sky? Get it right and you have an astro-landscape. Get it wrong and the ground gets smeared along the star track wherever the mask was mistaken.
It is a harder question than it sounds. Over blank sky there is nothing in your frames to answer it with, and glow, light pollution and lens vignetting all sit still in the frame the way the ground does, so they pull the answer the wrong way. AI Mask - Fixed Stars & Foreground answers it four ways at once:
- Physics. The sky moves and the ground does not, so where the two alignments disagree is real evidence of sky. The most trustworthy signal available, and it only speaks where a star actually crossed.
- AI object recognition. An image model that has seen an enormous number of photographs fills in everywhere the physics is silent, recognizing sky, horizon and vegetation the way you would.
- A model of the sky itself. Sky brightness varies smoothly, so it can be fitted as a surface and used to judge borderline pixels. A rising moon or a lit town on the horizon stops being a trap.
- An intelligent paint bucket. The mask is then filled outward from what is certain, following the real edges in the picture. This is the part that gets in among branches, grass and lacy foliage, where an outline was never going to be enough.
Pick it and everything above happens on its own. If you would rather not use a model at all, Basic Mask - Fixed Stars & Foreground is the same feature without the second step, and it improved a lot in 2.0.0: the fourth stage above, the edge-following fill, works without a model and now runs there too. It gives away far less of the foreground to the sky than it used to. The AI option is still better on a complicated skyline of trees and branches, which is the case it was built for.
About the model
This is the only part of MergeRAW that uses a model, and it is optional and off until you choose it. The model is not bundled: the first time you pick this blend, MergeRAW shows you the license, asks permission, and downloads it once, about 86 MB. After that it is on your machine for good.
It runs entirely on your own computer. No image, no thumbnail and no metadata is ever transmitted, and MergeRAW does not need a connection to merge. The only network access is that one download, with your consent.
A master switch, the storage location and a Delete Model button live in File › Plug-in Manager › MergeRAW › AI Features. Turn it off there and the blend is grayed out in the dialog.
Built with DINOv3. The model is DINOv3, published by Meta Platforms, Inc., and used under the DINOv3 License Agreement. A copy of the license is saved next to the model, and the Plug-in Manager will open either one for you.
Shooting for it
Nothing unusual, but two things help. Light painting the foreground on a much longer exposure than the sky frames is fine and MergeRAW expects it, using that frame for the ground only. And if a car passes, a plane crosses, or a satellite goes through a gap in the trees, leave the frame in: those are found and removed rather than being averaged into a faint streak.
The Advanced Dialog
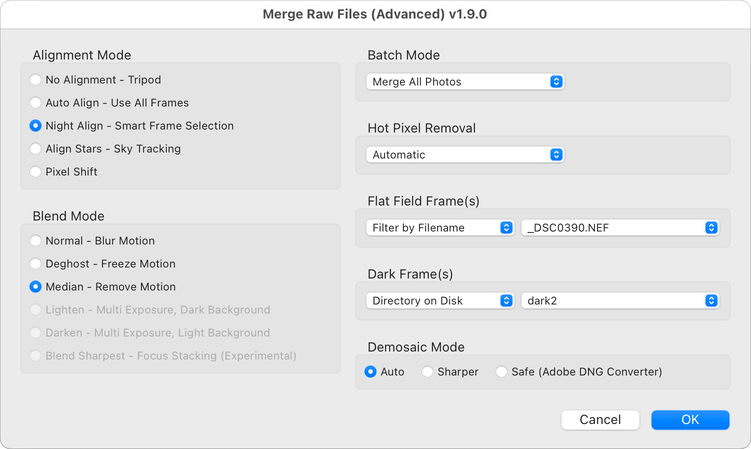
Merge Raw Files (Advanced) adds batch processing and sensor cleanup alongside the same two columns. All of it is optional, and the defaults match the simple dialog. Pixel Shift grays out Hot Pixel Removal and Demosaic Mode, because it assembles the raw frames directly.
Batch Mode
Hand it a whole shoot and get one file per group instead of one file total.
- Merge All Photos combines the selection into one DNG. The default.
- Merge Each Stack runs one merge per Lightroom stack. Stack as you cull, then merge the lot in one go. It pairs well with Lightroom's own Photo › Stacking › Auto-Stack by Capture Time, which groups a whole card of bursts for you in one step.
- Merge Each Directory does the same by folder.
- Process Each Photo is available with No Alignment - Tripod and does not merge. It applies your corrections to each photo separately, one DNG each. This is how you dark-frame or flat-field a whole shoot.
Hot Pixel Removal
Finds and repairs stuck pixels without needing a dark frame. The choice exists because a hot pixel and a star look the same to software, so you are telling it what it is looking at.
- Automatic uses exposure time to decide when repair is needed, then each frame's brightness to choose the policy. It normally requires at least a one-second exposure. Focus stacks also qualify when their known exposure times add up to one second, even if each frame is shorter. Eligible stacks of at least eight same-exposure Bayer frames also use a persistent hot-pixel map. The default, and right for nearly everything.
- Night Sky forces repair even for short exposures, with conservative protection for stars and star trails.
- Daylight Long Exposure forces per-frame repair for daylight scenes. Avoid it for stars or other tiny bright subjects; this setting does not request the persistent hot-pixel map.
- Off disables automatic hot-pixel repair. Dark frames you supply separately still apply.
Dark Frame(s)
A shot with the lens cap on, at the same exposure and temperature as your photos. It shows exactly which pixels misbehave, so those get repaired and nothing else is touched. More thorough than Hot Pixel Removal above, and worth it for long exposure and astro work.
Flat Field Frame(s)
A shot of an evenly lit blank surface, taken with the same lens and aperture. It corrects vignetting and corner color shift, the broad smooth unevenness across the frame rather than small spots. Mostly matters for copy and reproduction work, where flat areas need to actually be flat.
Give it flats from several apertures and each merge uses the ones matching its own f-stop, with a nearest-aperture fallback. Still experimental, so check the corners of anything important.
Picking Calibration Frames
Both pickers offer two families. Filter by Filename, Directory, Color or Stars pulls frames out of the selection you already made, so labeling your darks on import is enough. File on Disk and Directory on Disk reach anywhere on your drive, catalog or not, and remember where you have been.
Matching frames are combined into a calibration frame automatically. Calibration frames selected from the Library are excluded from the photos being merged and shared by every group in a batch.
Frames picked from disk that are not already in your catalog have to be added to it, and MergeRAW asks first. Lightroom gives plugins no way to remove them afterwards, so they stay.
Demosaic Mode
Raw files record one color per pixel and something has to fill in the rest. Normally that is Lightroom's job, and leaving it there keeps the most flexibility, but some merges have to do it themselves first.
- Auto does as little as possible: avoids demosaic entirely when the alignment and blend modes allow, and uses the best method for your sensor when it does not. The default, and almost always right.
- Sharper always uses MergeRAW's own conversion, which resolves finer detail on some sensors. Because it always converts, you can point it at a single photo and use MergeRAW as an alternative raw converter.
- Safe hands that step to Adobe DNG Converter. Try it if a merge shows color artifacts you do not like. Needs the converter installed, and is slower.
Results, Settings, Problems
What Comes Back
A new DNG in the same folder, added to your catalog next to the originals. The filename carries the mode, so a night merge of _DSC1234.NEF becomes _DSC1234_MergeRawNight.DNG.
It inherits the capture time, metadata, keywords and develop settings of your active photo, and joins the same collections, so it sorts into your timeline where you would expect. It is still a raw file, so white balance, profiles and highlight recovery all work as normal.
Plug-in Manager Settings
Select Ryan's Raw Tools in the plugin list under File › Plug-in Manager.
- Scratch folder. Merging writes temporary frames here. Point it at a fast drive with room to spare, especially if your photos live on a NAS.
- Photoshop. Only used by Edit Raw in Photoshop. Set it if auto-detection picks the wrong copy, or none.
- Recently used. Clear forgets the files and folders the advanced dialog's on-disk pickers remember.
- Troubleshooting. Open Log shows exactly what the last merge did, including every frame it kept or dropped and why. It is
mergeraw-stdout.txtin the scratch folder, and it is rewritten by each merge. - Language. MergeRAW follows Lightroom's own interface language, or you can pick one here: English, Bengali, Chinese (Simplified or Traditional), Dutch, French, German, Hindi, Italian, Japanese, Korean, Norwegian, Polish, Portuguese, Russian, Spanish, Swedish or Thai. The change applies the next time you open a dialog; the menu items themselves always follow Lightroom. The translations are new and not yet checked by native speakers — the same panel opens a folder where you can correct any wording, and finished translations sent to mergeraw@mackman.net ship to everyone.
- AI Features. The master switch for both AI Mask blends, the model folder, a Delete Model button, and the license. Nothing is downloaded until you choose an AI blend and agree. Changing the folder does not move existing files; deleting the model means it will be offered for download again on next use.
- Output compatibility. Merged DNGs use the newest DNG features by default, which makes the smallest files. If another application will not open a merged file, choose Common (DNG 1.7.0) — DXO PhotoLab needs this and quits without it — or Compatible (DNG 1.4.0) for older software still. Lightroom reads all three, and the merged image is identical either way; the lower settings only make the file larger.
Messages You Might See
MergeRAW tells you when a result is not quite what you asked for.
- Fewer photos merged than selected. Normal for Night Align. If it is dropping too many, shoot more frames or a faster shutter speed.
- Photos did not line up. Too little detail to track, or too much movement. Try Auto Align instead of Night Align, or a blend that handles motion like Deghost or Median.
- Night Align got an exposure bracket. It needs matching exposures, so it fell back to a plain average. Use Auto Align.
- Not enough stars to track. Cloud, light pollution or too short an exposure. Some cloudy frames are fine, but most need stars.
- Scratch disk warnings. Point the scratch folder somewhere with more room.
Something else, or something behaving oddly? Email mergeraw@mackman.net with MergeRAW in the subject, and attach the log file from the Plug-in Manager. It helps enormously.
The Other Tools
- Remove Built-In Profile strips the mandatory lens corrections some cameras bake into their raw files.
- Edit Raw in Photoshop round-trips through Photoshop and comes back as a raw file you can still develop.
- Fix IR PDAF Banding removes row banding from infrared and full-spectrum conversions.
What changed in the latest version is in the Change Log.